Using the Docker Images
The easiest way to get a working copy of LLAMA on any platform is to use the prebuilt LLAMA Docker images. These builds are automatically created and tested from the latest source code and have no external dependencies other than Docker. Docker is kind of like a Linux virtual-machine; you run a Docker “container” on your computer as if it were a totally separate computer, allowing the container to run the same regardless of whether you’re using Windows, Linux, or MacOS.
One difference of convention between VMs and Docker is that you’re usually expected to erase your Docker container as soon as you are done working with it, whereas a VM image might be persisted across multiple use sessions (you’re not forced to use Docker this way, but in general it’s probably useful to remember that Docker containers are supposed to be somewhat more ephemeral than your average VM). You can read plenty more online if you’re interested, but that’s all you need to know to get started.
NOTE that if you are trying to use the LLAMA images on Habanero, you will need to download and run them using Singularity (a container manager like Docker which supports Docker images). Check out the :ref:`instructions for using Singularity with LLAMA images <singularity-llama>`_ as well as the Habanero Singularity cluster job example documentation.
Installing Docker
First, you’ll need to install Docker for MacOS, Windows, or Linux. Follow the official Docker instructions. You might need to disable other VM solutions (like VMWare) for this to work. On Windows, you might be asked whether you want to use Linux or Windows virtual machines; make sure to choose Linux.
On Linux, Docker should run automatically in the background as a daemon process. On Windows or MacOS, you will need to manually start Docker the way you would any other application (though you can set it to start automatically at startup in both cases).
You will interact with Docker through a command line client that communicates
with the Docker daemon. What this means is that you will use a terminal to
control Docker via textual commands. If you get error messages saying that the
daemon isn’t running, you’ll need to manually start (or restart) the daemon as
described above. Again, on MacOS and Windows, this would involve finding the
program called Docker and launching it in the same way you would any other
program. To access the command line interface, you can open:
Terminal.app,iTerm.app,alacritty.app, etc on MacOScmd.exeorPowerShellon Windows (Note that on Windows you must not use Bash/Ubuntu/Windows Subsystem for Linux to issue Docker commands; use one of the native windows shells mentioned here)xterm,alacritty, etc. on Linux
After installing Docker, you can make sure the command line client is installed and the daemon running with:
docker run hello-world
which should spit out something like:
Unable to find image 'hello-world:latest' locally
latest: Pulling from library/hello-world
1b930d010525: Pull complete
Digest: sha256:b8ba256769a0ac28dd126d584e0a2011cd2877f3f76e093a7ae560f2a5301c00
Status: Downloaded newer image for hello-world:latest

Hello from Docker!
This message shows that your installation appears to be working correctly.

To generate this message, Docker took the following steps:
 1. The Docker client contacted the Docker daemon.
 2. The Docker daemon pulled the "hello-world" image from the Docker Hub.
    (amd64)
 3. The Docker daemon created a new container from that image which runs the
    executable that produces the output you are currently reading.
 4. The Docker daemon streamed that output to the Docker client, which sent it
    to your terminal.

To try something more ambitious, you can run an Ubuntu container with:
 $ docker run -it ubuntu bash

Share images, automate workflows, and more with a free Docker ID:
 https://hub.docker.com/

For more examples and ideas, visit:
 https://docs.docker.com/get-started/
Docker Cloud
LLAMA software is saved in a Docker image (basically a snapshot of a working Linux server with LLAMA installed) on Docker Cloud. You’ll need to make an account on Docker Cloud and share your username with Stef, who will add you to the list of contributors to the LLAMA Docker image. This will allow you to “pull” (i.e. download) copies of this image to your computer.
Once you’ve been added as a collaborator, you should be able to view the LLAMA repository on Docker Cloud.
Once this is set up, you can log in from the Docker daemon using the command
line interface by running docker login and providing your Docker Cloud
username and password.
Getting LLAMA Images
If you just want to run the pipeline, you can use the default image and skip ahead to the :ref:`running a LLAMA container <running-a-LLAMA-container>`_ section; LLAMA will automatically be pulled if it has not been downloaded already.
You’ll need to pull LLAMA images from Docker Cloud in order to use them; this is basically like pulling down a hard drive image of a working LLAMA server (the “image”) which Docker can then run as if it were its own seperate server (a “container”, which is the running version of the “image”). You can use the same command to update to the latest LLAMA image.
Choosing the Image
In most cases, you’ll want to use stefco/llama:py37-play as your LLAMA
Docker image, though a few other options do exist. You can probably skip to the
next section unless you want to use one of those other versions (in which case
you can substitute that image name for stefco/llama:py37-play where it
appears).
The LLAMA images are named
stefco/llama:<TAG>, where <TAG> is one of 3 values (at time of writing)
depending on the way the image is configured:
py37just contains the LLAMA software; it is not configured to communicate with any external services. You will rarely use this as it mainly serves as a base for the other two tags.py37-playis configured to pull IceCube data and communicate with the LLAMA team Slack. It will not upload results to IceCube Slack or GraceDB unless you configure it to do so, making it relatively safe for experimentation. It does have LIGO authentication software installed, so you can access GraceDB from it by runningkinit albert.einstein@LIGO.ORG(withalbert.einsteinreplaced by your LIGO username, of course) followed byligo-proxy-init -k.py37-prodis fully configured for automated production use. There’s not really any reason to use this on your laptop unless you know what you’re doing.
Additionally, you can access any successful tagged release of LLAMA by
appending a dash followed by the version tag of the source code. For example,
if you would like to explicitly use LLAMA version v2.28.8, you would append
-v2.28.8 to the end of the image name. The full image name for the
py37-play tag (which, again, is most appropriate for personal use) would
then be stefco/llama:py37-play-v2.28.8. If you omit the version, then the
latest version will be chosen.
Getting/Updating the Image
You can pull (i.e. download) the latest version of the LLAMA image with:
docker pull stefco/llama:py37-play
The image is fairly large (several GB), so this will take a while. Note that this will download the latest version of the image even if you have an older version installed, so you can use this command to update to the latest version. See the previous section for more details on choosing a LLAMA image version.
Removing Images
Images are just starting points for containers; you can redownload them whenever you have a fast internet connection, so feel free to delete them when you need to free up space.
You can list installed images with
docker image list
Which will print something like the below, with each installed image listed on its own line:
REPOSITORY    TAG        IMAGE ID      CREATED             SIZE
stefco/llama  py37-play  5dd57ee20554  About an hour ago   4.59GB
You can delete this by either referencing the TAG or IMAGE ID. For
instance, you could delete the above with:
docker image rm stefco/llama:py37-play
or
docker image rm 5dd57ee20554
If you’re not running any Docker containers and don’t mind redownloading images, you can also delete all local Docker data with a single command:
docker system prune --all
(This might take a little while.)
Running a LLAMA Container
You can run an interactive LLAMA session using:
docker run -it --rm stefco/llama:py37-play bash
Note that whatever work you do will not be transferred to your host computer unless you share directories between the host and container. If you are creating analysis results that you want to copy to your local system, you can :ref:`mount Docker directories <mount-Docker-directories>`_ from your host machine to your local machine as described in the next section.
The previous command will download the LLAMA Docker image if it is not present locally and start it up. A quick breakdown of what each option is doing:
runtells Docker to create a new container from the specified image and run commands on it.-itis the same as-i -t;-itells Docker to set up an interactive session and-ttells Docker to create a pseudo-TTY (i.e. a terminal) for interaction. In other words, start up a command line in the LLAMA container so that we can use it like a normal server.--rmtells Docker to delete this container as soon as we exit from the interactive session, throwing out any changes we’ve made to the base image. You almost certainly will want to use--rmevery time youdocker run.stefco/llama:py37-playis the name of the container we want to use.bashis the starting command; you can omitbash, in which case you’ll be thrown into the somewhat less feature-rich defaultshshell. (Alternatively, you can specify another shell or command that should run instead of bash.)
You’ll now have an interactive LLAMA prompt in front of you. You can use the
:ref:`LLAMA Command Line Interface <LLAMA-Command-Line-Interface>`_, e.g. by running llama and reading the
help documentation, or you can start up ipython and import llama to
start using the library directly in iPython.
Mounting Directories
One of the nice things about Docker is that it lets you share and sync directories between host (your computer) and Docker container. This means you can do work in the container in a shared directory, and the output files will appear in the corresponding directory, and the output files will also appear in the corresponding shared folder in your host machine. Directories are only synced this way if you explicitly request it, so it’s easy to avoid unpredictably contaminating your host machine no matter how badly you screw up a container (within reason).
Because paths are specified differently in Windows vs. UNIX-like operating
systems, the instructions are slightly different based on the platform, though
in both cases you add a -v host_path:container_path flag to a docker
run command like the one given previously in :ref:`running a LLAMA
container <running-a-LLAMA-container>`_.
Note that in both cases the directory on the host machine, host_path,
must exist on the host machine and must be an absolute path, e.g.
/home/stef/dev will work but a relative path like dev will not (at time
of writing). container_path should resolve to a a path in an existing
directory; if container_path itself already exists, Docker will mount the
host volume on top of it, effectively rendering the existing directory
inaccessible (which might be desired behavior depending on your use case, but
it’s something to be aware of).
Note that, if you have a long-running container that you don’t want to stop (perhaps because you forgot to mount a volume when you created it), you can still mount a volume on it. It’s also possible to specify Docker volumes that persist between containers and are not directly accessible to the host machine; these have higher performance than the shared mounts discussed here and are good for persisting state/transferring data between containers in cases where convenient sharing with the host is not the top priority. Refer to the Docker API for information on how to do this.
Mounting in MacOS/Linux
On MacOS or Linux, you simply specify the host directory to mount followed by a
colon and the path on the container. For example, if you’re on MacOS and your
username is Stef, you could mount your home directory to /root/stef in
the container with -v /Users/Stef/:/root/stef. The example given in
:ref:`running a LLAMA container <running-a-LLAMA-container>`_ would look like:
docker run -it --rm -v /Users/Stef:/root/stef stefco/llama:py37-play bash
This is the same as the previous example, except now you’ll be able to access
and modify the contents of your home directory on your host computer from the
container’s /root/stef directory. You can of course use this to save
analysis results on your local computer, allowing you to persist your analysis
results even after exiting your interactive Docker session (which, as described
above, will delete the container automatically when used with the --rm
flag).
Mounting in Windows
This is the same as in MacOS/Linux, but the path on the host must include the
root volume name (e.g. C:). You can also use Windows-style back-slash
directory separators for the host path, though the container path must still be
in UNIX format (forward-slashes). Before you can mount a host directory,
however, you’ll have to tell Windows to allow the directory to be mounted. This
can be done from the Docker daemon graphical control panel in the system tray:
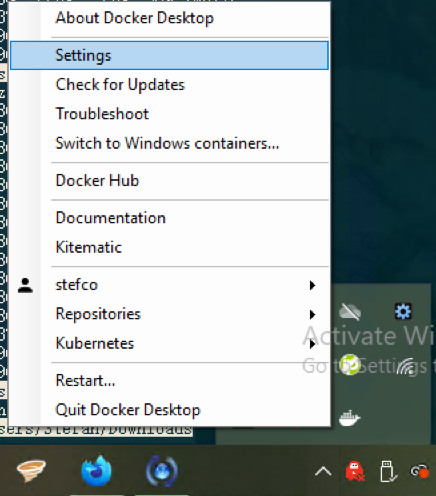
The Docker daemon settings can be accessed from the system tray on Windows; click on the tray icon and select “settings” from the pop-up menu.
You can then select the drives you wish to make available to Docker containers
from your host machine. If you have a single Windows hard drive where you’re
storing your analysis results, you will most likely want to choose C:.
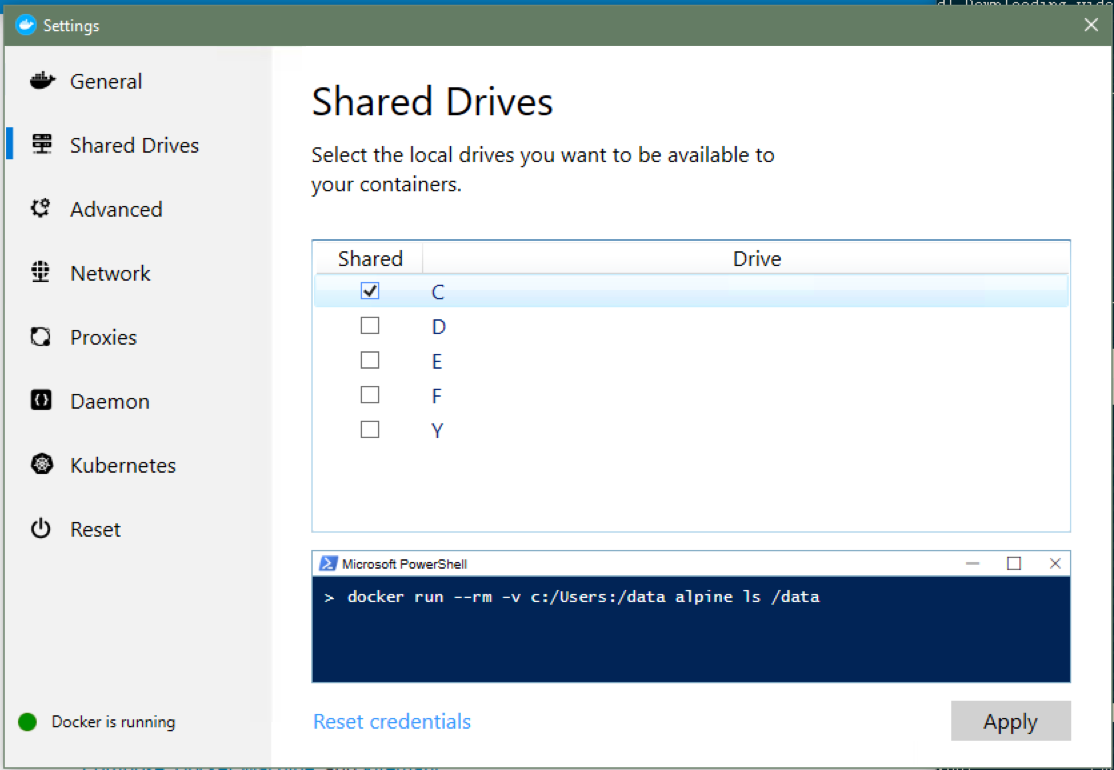
Select the volumes you’d like to make available for sharing and hit
Apply when done.
Now, assuming your windows username is Stef and you want to mount your home
directory to /root/stef on the Docker container, you would add the volume
mount in the same way as was done in the MacOS/Linux example, though again
you’ll use Windows-style path syntax (again, remember to use absolute paths
rather than relative paths):
docker run -it --rm -v C:/Users/Stef:/root/stef stefco/llama:py37-play bash
Or, using Windows path style for the host path,
docker run -it --rm -v C:\Users\Stef:/root/stef stefco/llama:py37-play bash
Note that for Windows hosts the first colon is used to represent the local volume, and so the second colon is the one that separates the host path from the container mount path.
Out of Memory/Disk
If you are getting a MemoryError when you run memory-intensive parts of the
analysis, you can either add more memory through your Docker settings or add
:ref:`swap space <swap-space>`_ to your container; this can be done with the linked
instructions within an interactive container session.
You can also increase the amount of disk space available to Docker from the Docker daemon control panel, though you are unlikely to need much space if you are doing one-off activities like processing public events from an observing run.
Running on Habanero
If you’re trying to run on the Habanero cluster, first read the Choosing the Image section to learn how to pick the correct LLAMA image for your job.
Interactive Habanero Jobs
Log in to Habanero using:
ssh uni@habanero.rcs.columbia.edu
Where uni is your Columbia UNI (i.e. username). You’ll be asked for your
Columbia password. If you can’t log in this way, ask Zsuzsa whether you have
access to Habanero.
When you first log in to Habanero, you will be using a log in node; you are running on a shared server that puts severe limits on how much computing power you can use. You are supposed to use this node only for submitting batch jobs or, if you want to do interactive work (which we will below), for starting an interactive session on a high-powered node.
You can start an interactive session with:
srun --pty -t 0-01:00 -A geco /bin/bash
This will take a few seconds to start up. Once it does, you’ll be running on an
interactive node with much more available computing power. It’s a good idea to
do this pretty much any time you want to do anything on Habanero. Of course,
the above command is hard to memorize, so you’ll probably want to add the
following to your ~/.bashrc:
alias interactive='srun --pty -t 0-01:00 -A geco /bin/bash'
Refresh your ~/.bashrc with source ~/.bashrc. Now, you can start an
interactive session simply by running interactive, and it will execute the
same command we ran above.
Once you are finished with your interactive session, you can stop it by running
exit, and you will be returned to the login node. BEWARE that Habanero
likes to boot users out of interactive sessions after a few hours, and that
there is no way to log out of an interactive session without killing it.
Habanero is designed as a batch-processing cluster; if you need a persistent
server, spin one up using DigitalOcean or something like it.
Docker Hub Authentication with Singularity
You’ll probably want to use the private LLAMA Docker images, which have all of
the LLAMA software installed and certain authentication credentials
pre-configured. To do this, you will need access to the private Docker Hub
LLAMA repository.
(Note that if you can’t view the previous link, it probably means you need to
create Docker Hub login credentials and then ask Stef to add you as a
collaborator to that repository.)
To provide Docker Hub login credentials to Singularity, you’ll need to set the
SINGULARITY_DOCKER_USERNAME and SINGULARITY_DOCKER_PASSWORD
environmental variables to your Docker Hub username and password, respectively.
The easiest way to do this is to add the following two lines to your
~/.bashrc:
# put this in ~/.bashrc
export SINGULARITY_DOCKER_USERNAME="username"
export SINGULARITY_DOCKER_PASSWORD="password"
Where, of course, you replace username with your username and password
with your password. Reload your ~/.bashrc to make these changes take effect
with:
source ~/.bashrc
Fixing Singularity Cache on Habanero
Unfortunately, Habanero only lets you keep a small amount of data in your home
directory. This is a problem for Singularity, which keeps its downloaded data
in ~/.singularity; LLAMA’s huge docker images will rapidly use up your
space quota, and your attempts to pull images will fail; this is true even if
you try to save your downloaded images somewhere with space, since the files
will first be downloaded to ~/.singularity anyway.
The solution to this problem is to make your own directory in our much larger
group data volume, /rigel/geco/users, and create a symbolic link pointing
from the default ~/.singularity path to one stored in your directory on the
group volume. First, make your directory in the group volume (if you haven’t
already). Run the following, replacing uni with your Columbia UNI:
mkdir /rigel/geco/users/uni
You’ll get an error if the directory exists or if you are not part of the GECo group on Habanero. If this second case is the issue, bug Zsuzsa to get you in the group.
Now, you might already have a ~/.singularity directory set up; if that’s
the case, you can go ahead and remove it, since it generally only contains
cached data.
rm -rf ~/.singularity
Next, make a new Singularity directory in you /rigel/geco directory, again
replacing ``uni`` in the below command with your Columbia UNI:
mkdir /rigel/geco/users/uni/.singularity
Finally, you can create a symbolic link telling the operating system to use
this new directory whenever it wants to use ~/.singularity (again,
replace uni with your Columbia UNI):
ln -s /rigel/geco/users/uni/.singularity ~/.singularity
Load Singularity Module
You’ll need to load the Singularity module before you’ll have access to the
command line interface. Module loading is Habanero’s way of letting you choose
which programs are available; a lot of stuff that’s installed is only available
for use by calling module load <modulename>. Let’s load the Singularity
module:
module load singularity
Pull LLAMA Image
Now, we’re finally ready to get our LLAMA image. Again, if you need help
choosing an image, refer to the Choosing the Image section. Let’s say you
want to use the latest version of the play image (used for processing data
without pushing it to IceCube or other collaborators), called
stefco/llama:py37-play. First, navigate to your personal directory in
/rigel/geco (replace uni with your Columbia UNI):
cd /rigel/geco/users/uni
You can now pull the image and save it in Singularity’s format as
llama-play.sif using the following command (though be warned, it will
take a VERY long time for Singularity to build the image after pulling it):
singularity pull llama-play.sif docker://stefco/llama:py37-play
Again, this command will take a very long time; even after it has finished
copying data from Docker Hub, it will spend a while combining the data into a
single output image, llama-play.sif. Don’t worry if it seems like it’s
frozen; as long as it hasn’t exited with an error, it’s probably running okay.
Once this command finishes, run ls; you should see your new image, called
llama-play.sif. You can run this image using:
singularity run llama-play.sif
Local Installation
These installation instructions are for more advanced users who want to install LLAMA on their local machine without the use of Docker. See :ref:`the developer instructions <developer-instructions>`_ for information on developer dependencies and tools as well as further background documentation.
This section is not guaranteed to be as up-to-date as the Docker instructions because it is subject to more frequent change. The official provisioning/installation procedure can always be recovered from the continuous integration procedures used to create the Docker images.
System Requirements
Make sure you have at least 4GB of memory (physical or virtual; :ref:`swap space <swap-space>`_ is fine) and 15GB of free space on your file system.
Installing Conda
LLAMA depends on LIGO tools that are only distributed via conda, so you’ll
need to install an Anaconda python distribution to get up and running
(developer notes on Conda <migrating-to-conda>):
Conda installs are done on a per-user basis, so you won’t need to use sudo for
any of the below. Start by installing the latest version of Conda:
curl -O https://repo.continuum.io/miniconda/Miniconda3-latest-Linux-x86_64.sh
bash Miniconda3-latest-Linux-x86_64.sh
Log out and log back in again, then activate conda-forge and install LIGO
tools:
conda activate
conda config --add channels conda-forge
# old method: use LIGO's environment
# wget -q https://git.ligo.org/lscsoft/conda/raw/master/environment-py36.yml
# conda env create -f environment-py36.yml
curl -O https://raw.githubusercontent.com/stefco/llama-env/master/llama-py36.yml
conda env create -f llama-py36.yml
Activate the LIGO virtualenv (NOTE: You will need to do this every time you
want to use this python setup! Consider putting this command in your
.bashrc file.):
conda activate llama-py36
Clone the LLAMA repository into ~/dev/multimessenger-pipeline:
mkdir -p ~/dev
cd ~/dev
git clone git@bitbucket.org:stefancountryman/multimessenger-pipeline.git
cd multimessenger-pipeline
Fetch all data files (make sure you have git-lfs installed)
git lfs fetch
git lfs checkout
Install dependencies:
curl -O https://raw.githubusercontent.com/stefco/llama-env/master/requirements.txt
pip install -r requirements.txt
Install the pipeline in developer mode:
python setup.py develop
Confirm installation succeeded by seeing if you can print the help command from the command-line interface (CLI):
llama --help
Optionally, run LLAMA’s test suite to make sure things are working okay (though note that many tests will fail if you haven’t :ref:`entered your authentication credentials for external services <config-and-auth>`_):
make test
That’s it! All important llama tools can be accessed at the command line
as subcommands of the llama command; run llama --help to see what’s
available. The llama CLI follows the same structure as the llama python
modules, which you can import into your python scripts.
Setting Up a Production Server
You can set up a production server environment on a Debian server as follows. You can skip the installation steps for Docker and Docker Compose if you already have them installed.
Install Docker
The LLAMA production environment runs in a Docker container to massively simplify deployment and reproducibility. On Debian:
curl -fsSL https://download.docker.com/linux/debian/gpg | apt-key add -
apt-key fingerprint 0EBFCD88
|
add-apt-repository \
    "deb [arch=amd64] https://download.docker.com/linux/debian \
    $(lsb_release -cs) \
    stable"
apt-get update
apt-get install -y docker-ce docker-ce-cli containerd.io
docker run hello-world
Install Docker Compose
We use Docker Compose to turn on all LLAMA components at once and to keep them running. Install Docker Compose with:
curl -L \
    "https://github.com/docker/compose/releases/download/1.24.1/docker-compose-$(uname -s)-$(uname -m)" \
    -o /usr/local/bin/docker-compose
chmod +x /usr/local/bin/docker-compose
docker-compose --version
Log in to Docker Cloud
The LLAMA production docker images are in a private repository on Docker Cloud.
You will need to be added to the stefco/llama Docker Cloud repository
(contact Stefan Countryman for details) and log in on the production server
using docker login:
docker login
You’ll be promted for your Docker Cloud login credentials; enter them to log in.
Get docker-compose.yml
docker-compose.yml is a file that describes how to combine Docker
containers together; since LLAMA has a few moving parts that need to work
together, it saves us the trouble of having to remember what steps are
necessary to turn the pipeline on and keep it running. You can think of it as a
shortcut for calling a ton of docker commands every time we want to start
up our app.
You can always pull the latest version of docker-compose.yml from the
LLAMA repository
with this command:
pushd ~ && git archive \
        --remote=git@bitbucket.org:stefancountryman/multimessenger-pipeline.git \
        HEAD docker-compose.yml \
    | tar -x && popd
Starting LLAMA Production App
Fortunately, all the hard work is done for you in docker-compose.yml; you
just need to start it with docker-compose up:
docker-compose up